6 minutes
T-Pot Honeypot Setup and Attack Monitoring
What is a honeypot?
A Honeypot is a decoy system or network resource designed to attract, detect, and study cyberattacks by mimicking a legitimate and valuable target.It serves as a trap for attackers, luring them into a controlled environment where security professionals can observe and gather intel.
Project objective
Deploy a production-style T-Pot honeypot instance, validate it’s collecting telemetry, and demonstrate basic analyst workflows: access the Kibana web UI, filter events (by IP/port/service), extract IOCs (IPs, usernames, passwords).
Required tools & prerequisites
Account & host
Cloud VM or dedicated host with virtualization
Minimum footprint: 8 GB RAM, 4 vCPU, 80 GB disk (use larger if you plan extended capture).
Public IPv4 address (for honeypot visibility). Optional: DNS name that looks legitimate.
Access & permissions
Root or sudo admin account on the VM. Ability to open/forward TCP ports and reboot the instance.
Credit card or cloud credits if using public cloud (DigitalOcean, Vultr, AWS).
Network & security
Isolated environment policy: do not run on a host that can access your production network. Use host-only or strictly firewalled environment if local.
Host firewall rules and ability to open the T-Pot web ports (default installer changes SSH port and exposes Kibana/ELK UI).
Optional: a jump host or bastion for secure admin access.
Software & dependencies
git,curl,wget,unzipinstalled on the VM.Docker & Docker Compose (T-Pot installer will handle most requirements but ensure the host supports Docker).
Ability to install and run
systemdservices (standard on Ubuntu).
Operational
Snapshot capability (create VM snapshot before install and before running samples).
Time to complete: ~30–90 minutes for installation on a sufficiently provisioned VM; longer if networking/tuning required.
Budget note: cloud hourly/monthly costs apply; install may require a reboot and short downtime.
Safety & policy
Understand legal/ethical constraints: honeypots attract malicious traffic — do not use them to proxy traffic to other networks, do not host third-party content, and ensure you have the right to expose the VM on the public Internet.
Logging retention and disk consumption planning (ELK can grow quickly).
–
You can either make either make this on your virtual machine, or cloud. For cloud choose any platform(DigitalOcean, Vultr, etc) and make an account. You will usually get free credits for some months or so. Use them to complete this project.
For now , I will use a cloud platform called DigitalOcean. Use this link to get a free $200 credit , should be more than enough for this project.
https://www.digitalocean.com/?refcode=e2ce5a05f701&utm_campaign=Referral_Invite&utm_medium=Referral_Program&utm_source=CopyPaste
To activate this credit, you must link a valid credit card.
Note: If you opted for the cloud option, don't forget set the hostname name as legit as possible. Eg: WBC-Web-Server2.
Creating our Cloud VM
After creating an account, navigate to “Create —> Droplets”. Now select these things:
- A datacenter close to your home
- Ubuntu version
24.04 (LTS) x64 - Regular Disk type SSD
- $48/mo (8 gb/4 CPU) plan —-
might change in the future - Use Password authentication method
- Hostname must sound legit
WBC-Web-Server2
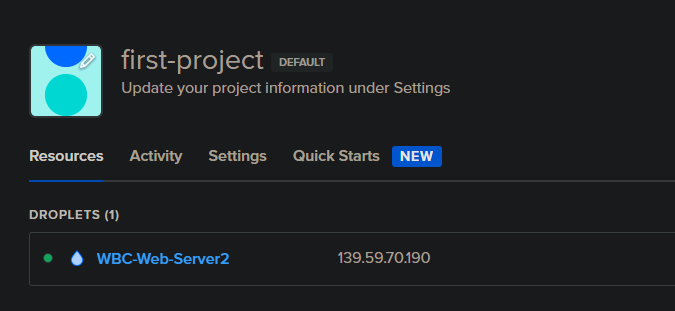
Click on your droplet and you will find additional information regarding that VM.

It is important to configure a firewall so that only you and your associated IPs can connect to this machine but since this a Honeypot, you want it to be able to be accessible from anywhere.
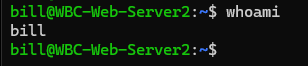
Accessing the VM and Creating User
To access the VM, you can already see the public IPv4 address in the above screenshot. Copy it and open powershell and login via SSH:

Update the drivers to avoid future errors. Press “enter” if prompt to do so.

Once this is done, you must also create a new user. Only one user exist at the moment which is the Rootuser and it is not best practice to run commands or use the vm with root account.
User creation:
adduser bill (you can use whatever name you want)
Leave other details of bill as empty.
Also add billto the sudo group.
A sudo group is **a group of superusers that have privileged access to root commands**
sudo usermod -aG sudo bill
bill will now have admin privileges.
Finally, switch user to bill by using this command:
su bill
Installing T-Pot HoneyPot
Clone this github repo :
git clone https://github.com/telekom-security/tpotce
Change directories to tpotce and run the install script and follow the onscreen instructions:

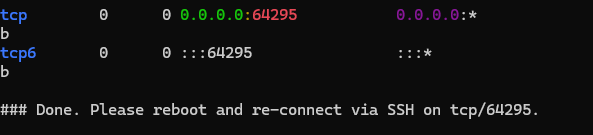
Keep in mind that this installation will change your ssh port to 64295, shown in the output. That means to log back in with ssh , you mush specify this port
ssh bill@<ipaddr> -p 64295

After some time this will pop up, select the first option:
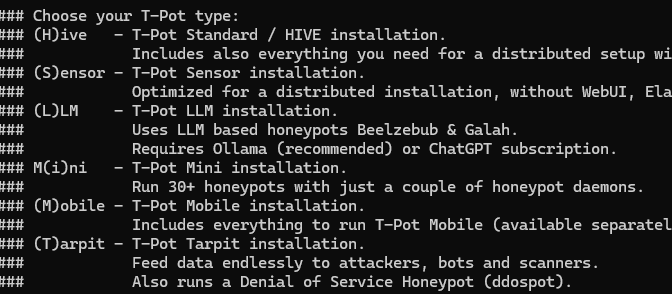
Type bill as the web-user or whatever name you chose.
This process might take some time , and might also fail if you chose a VM with low ram during the installation. If that happens, select M for mini T-pot installation.
sudo reboot
Wait a few mins before reconnecting.
ssh root@139.59.70.190 -p 64295
After re-logging in , you can view the status of the tpot service running by running this command :
systemctl status tpot

systemctl restart tpot  ( if you have trouble viewing the webUI )
T-Pot Honeypot WebUI
After everything is complete , you can view the webUI with this port :
https://<your.ip>:64297
It will throw us on a landing page where you can view the attack map. There are other options as well.
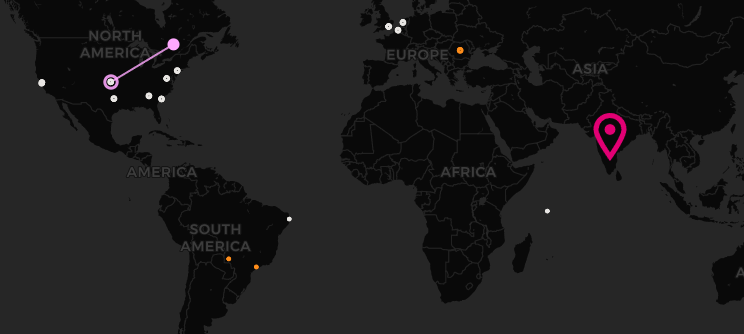
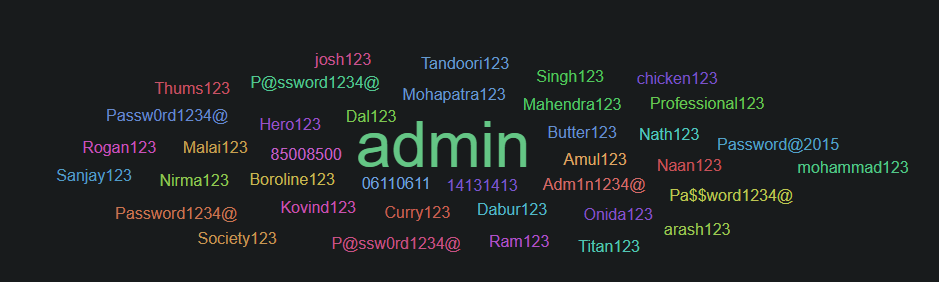
Select the "kibana" option from the landing page and you will be presented with a dashboard in Elastic SIEM. You can filter it by IPs , ports , services attacked, passwords used to brute force, users attacked, etc.
There are hundreds of attacks and scans already happening and If you check back the map after a hour or so , you will see a lot more action.
I encourage you to play around with it and have fun, its pretty cool.
Closing summary:
Skills learned & concepts reinforced
Infrastructure provisioning & hardening
- Creating and configuring a cloud VM, non-root user creation, minimal privilege management, and snapshot-based recovery workflows.
Service deployment & package orchestration
- Using
gitand the T-Pot installer, understanding Docker/compose orchestration, recognizing common install failures and resource constraints, and managing services withsystemctl.
- Using
Honeypot concepts and telemetry collection
- Why honeypots are used (intelligence, early detection, signature generation), and how multiple sensors (Telnet/SSH/HTTP/Elastic/Suricata/ConPot/etc.) are combined to create high-fidelity telemetry.
Log analysis and triage
- Accessing Kibana dashboards, filtering by IP/port/service/time, extracting IOCs (IPs, usernames, passwords, URI paths), and correlating events across network (pcap) and host logs.
Detection & operationalization
- Producing actionable outputs: IOCs for firewall/IDS, Suricata/Zeek/IDS rules, and initial remediation advice (block lists, network segmentation, rate limiting).
Practical operational skills
- Safe handling of live malicious traffic (isolation, snapshot recovery), resource planning for logging, and documenting evidence for reproducible analysis.
1111 Words
0000-12-31 16:07